Inspirations: My Top 5 In-Camera Multiple Exposure Techniques
One of the joys of photography is discovering new ways to express creativity—and in-camera multiple exposure photography is one of the most rewarding ways to do just that. Whether you’re photographing landscapes, city scenes, or abstract patterns, combining images in-camera opens up an incredible world of experimentation and play.
Multiple exposure allows you to layer two or more frames together, blending light, shape, and texture directly within your camera. Different camera models handle this feature in slightly different ways, so it’s always worth checking your manual, but once you’ve got it set up, the fun really begins.
For me, the appeal lies in the freedom it gives - composing all the layers of an image at once makes you think deeply about shape, rhythm, and composition. It’s not just about creating something visually striking, but also about getting a real feel for a place and capturing its energy in a new way.
My favourite techniques do change from time to time (Bokeh, for instance, is always close to my heart—but that was the subject of my last blog!). For now, though, these are my current top five in-camera multiple exposure techniques that continue to inspire me.
1. Crosshatching
Crosshatching is my own name for a wonderfully energetic technique that combines intentional camera movement (or, as the brilliant Stephanie Johnson has recently and beautifully, rephrased it, intentional creative movement) with multiple exposure. I use a shutter speed of around 1/8 or 1/15 of a second to create two images—one with a quick, sharp movement upwards, and another moving left to right. The result? Intersecting lines of light and form that retain structure while bursting with movement.
One of my favourite examples of this technique is an image of the West Pier in Brighton. Once a magnificent Victorian structure, the pier opened in 1866 and was one of Britain’s most beloved seaside landmarks. Sadly, fires and storm damage have reduced it to a hauntingly beautiful skeleton that still stands proudly in the water. Photographing it at sunrise, the colours were already vivid, but I later added a layer of red paint in post-processing to intensify the warmth and drama. This combination of in-camera creativity and subtle editing made the image sing, proof that even ruins can radiate beauty through creative photography.
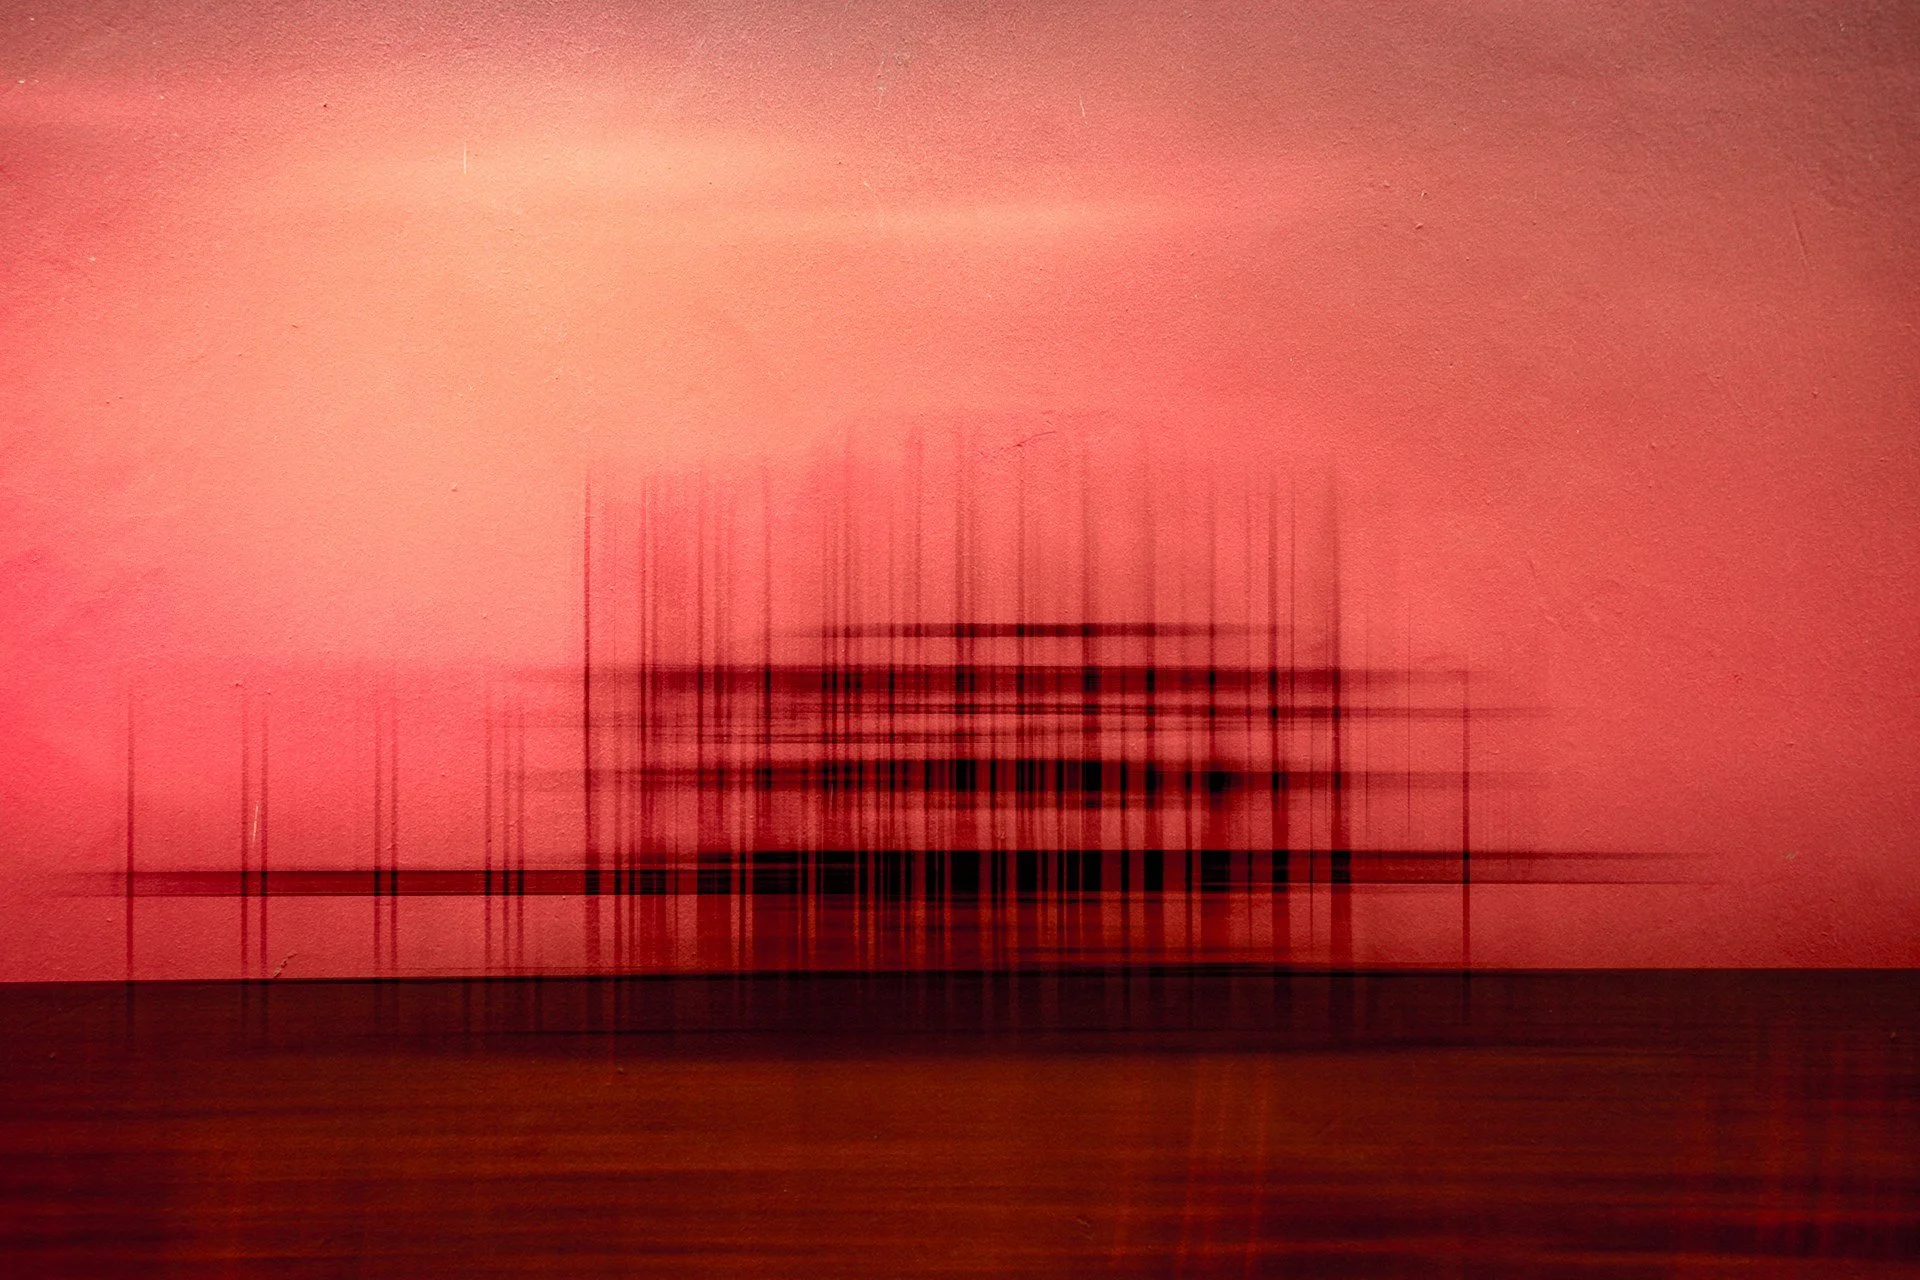
In-Camera Multiple Exposure Photography image of the West Pier, Brighton
2. Trees: In the Round
The next technique, “in the round,” is inspired by Pep Ventosa, a Spanish photographer known for his innovative “Trees in the Round” series. Ventosa walks around his subject—often a single tree—taking multiple images from different angles, then blends them to create painterly, dreamlike compositions.
While I often use Photoshop for this style, I’ve increasingly enjoyed creating it directly in camera when the conditions are right. The key is to walk slowly around the tree, taking exposures as you go and lining them up carefully. Depending on the lighting and colours, I use average mode for soft blending or dark mode if the tree is particularly bright.
It’s deeply satisfying when all the elements align—angle, light, colour—and you see the final image emerge with a sense of depth and movement that’s entirely unique to this method.
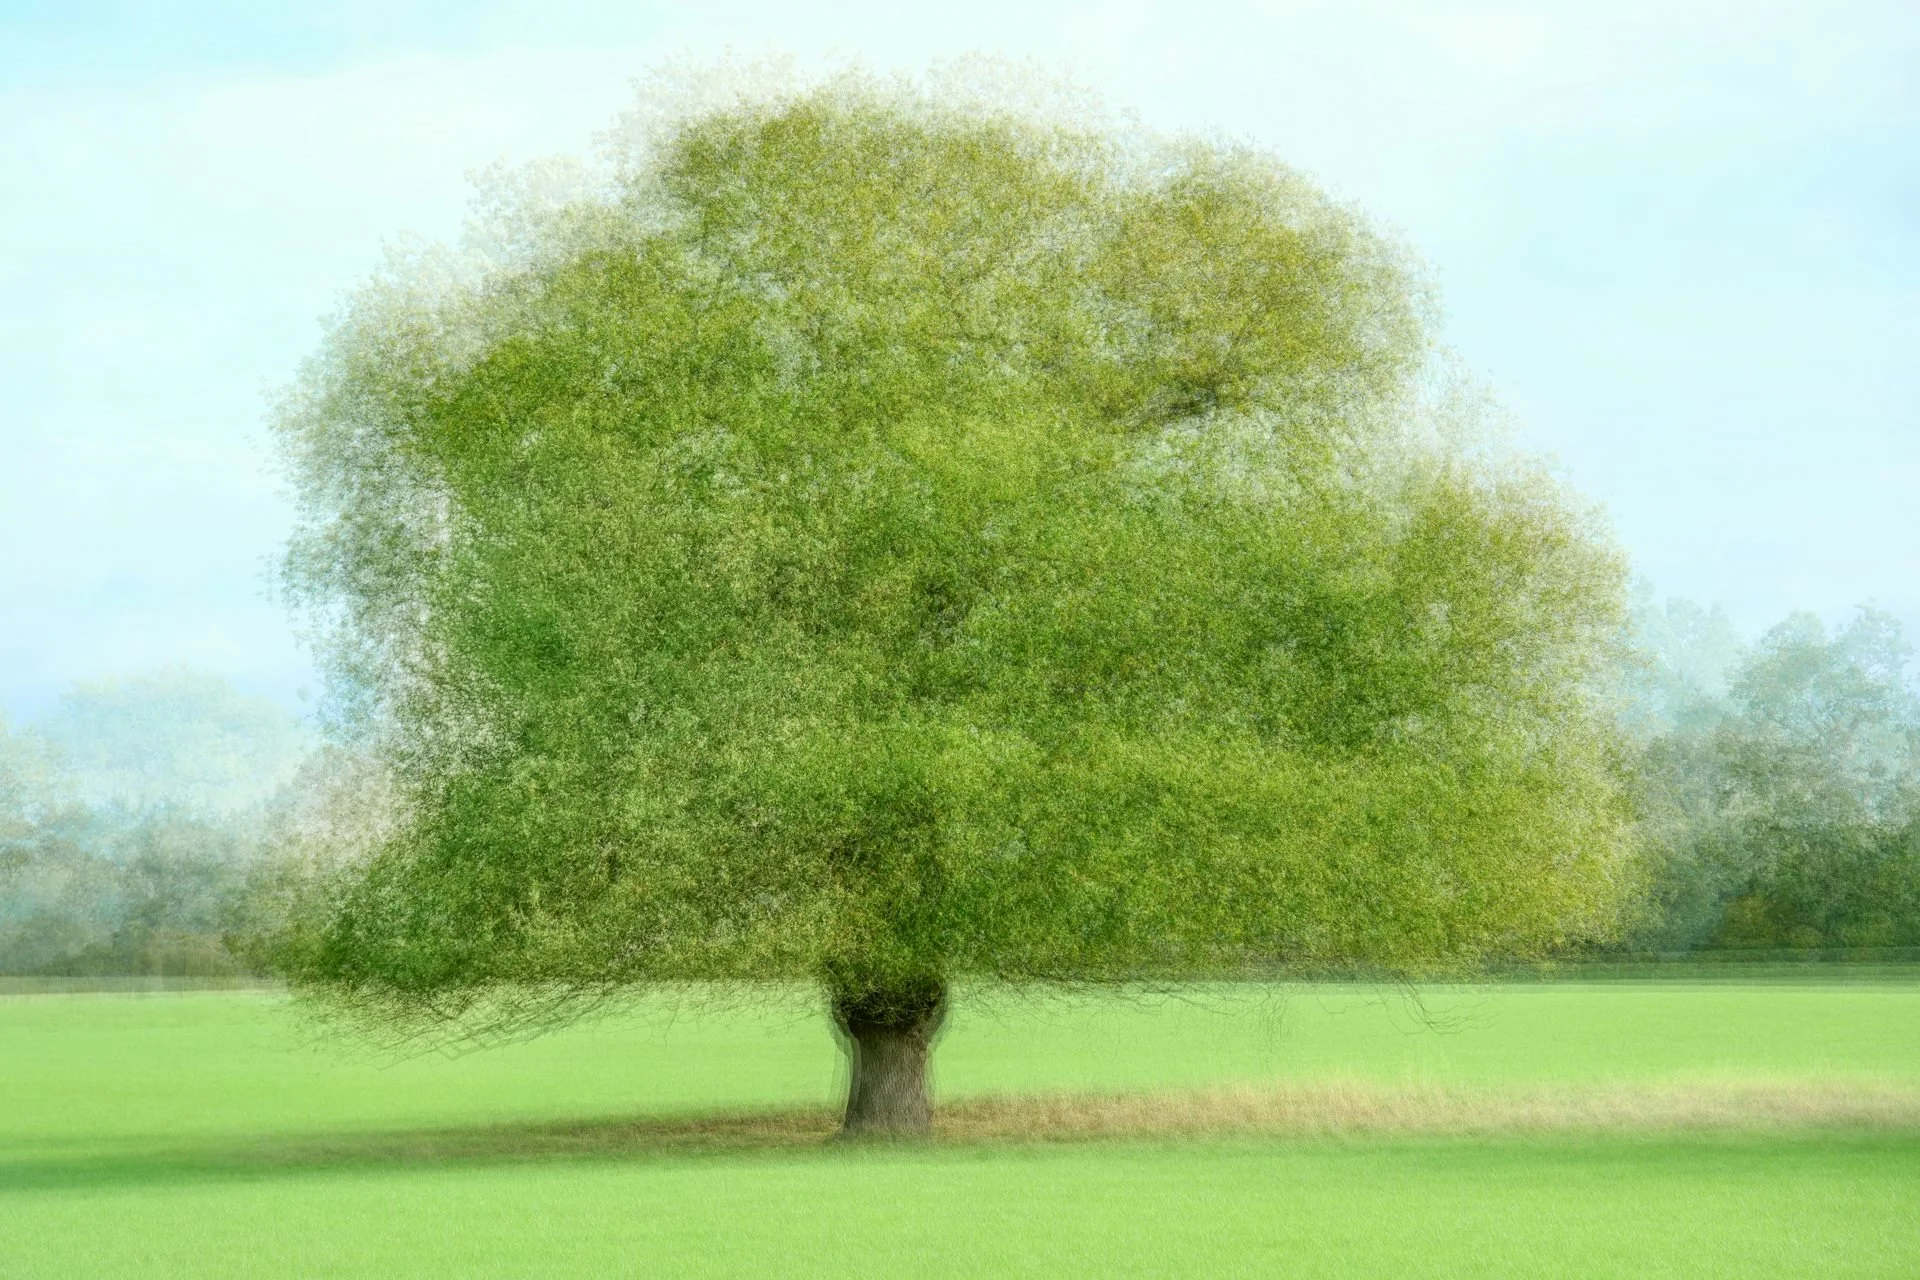
An In-Camera Multiple Exposure Photography Image of a tree having walked around it and taken shots at all angles.
3. Flipped Compositions
Flipped compositions remain one of my all-time favourites, especially when I find a building with striking architectural symmetry. One perfect subject is Feskekôrka in Gothenburg, Sweden. Known as the “Fish Church,” this neo-Gothic fish market hall was built in 1874 and designed by architect Victor von Gegerfelt. Its arched roof and pointed windows resemble a medieval church—but inside, it’s filled with the bustle and scent of fresh seafood!
To create this effect, you take your first exposure normally, then flip the camera upside down for the second. It’s simple, but the mirrored result can be stunning—almost kaleidoscopic. Some of my workshop participants find it easier to take the “upside down” image first, as it helps with lining up the second frame. Experiment and see which feels more intuitive for you.
The trick is to make sure the subject in your first shot occupies roughly half of the frame, leaving room for the second exposure. For this particular image, I also raised the white balance slightly to create a golden, ethereal tone—perfect for reflecting the warm hues of the Swedish light.
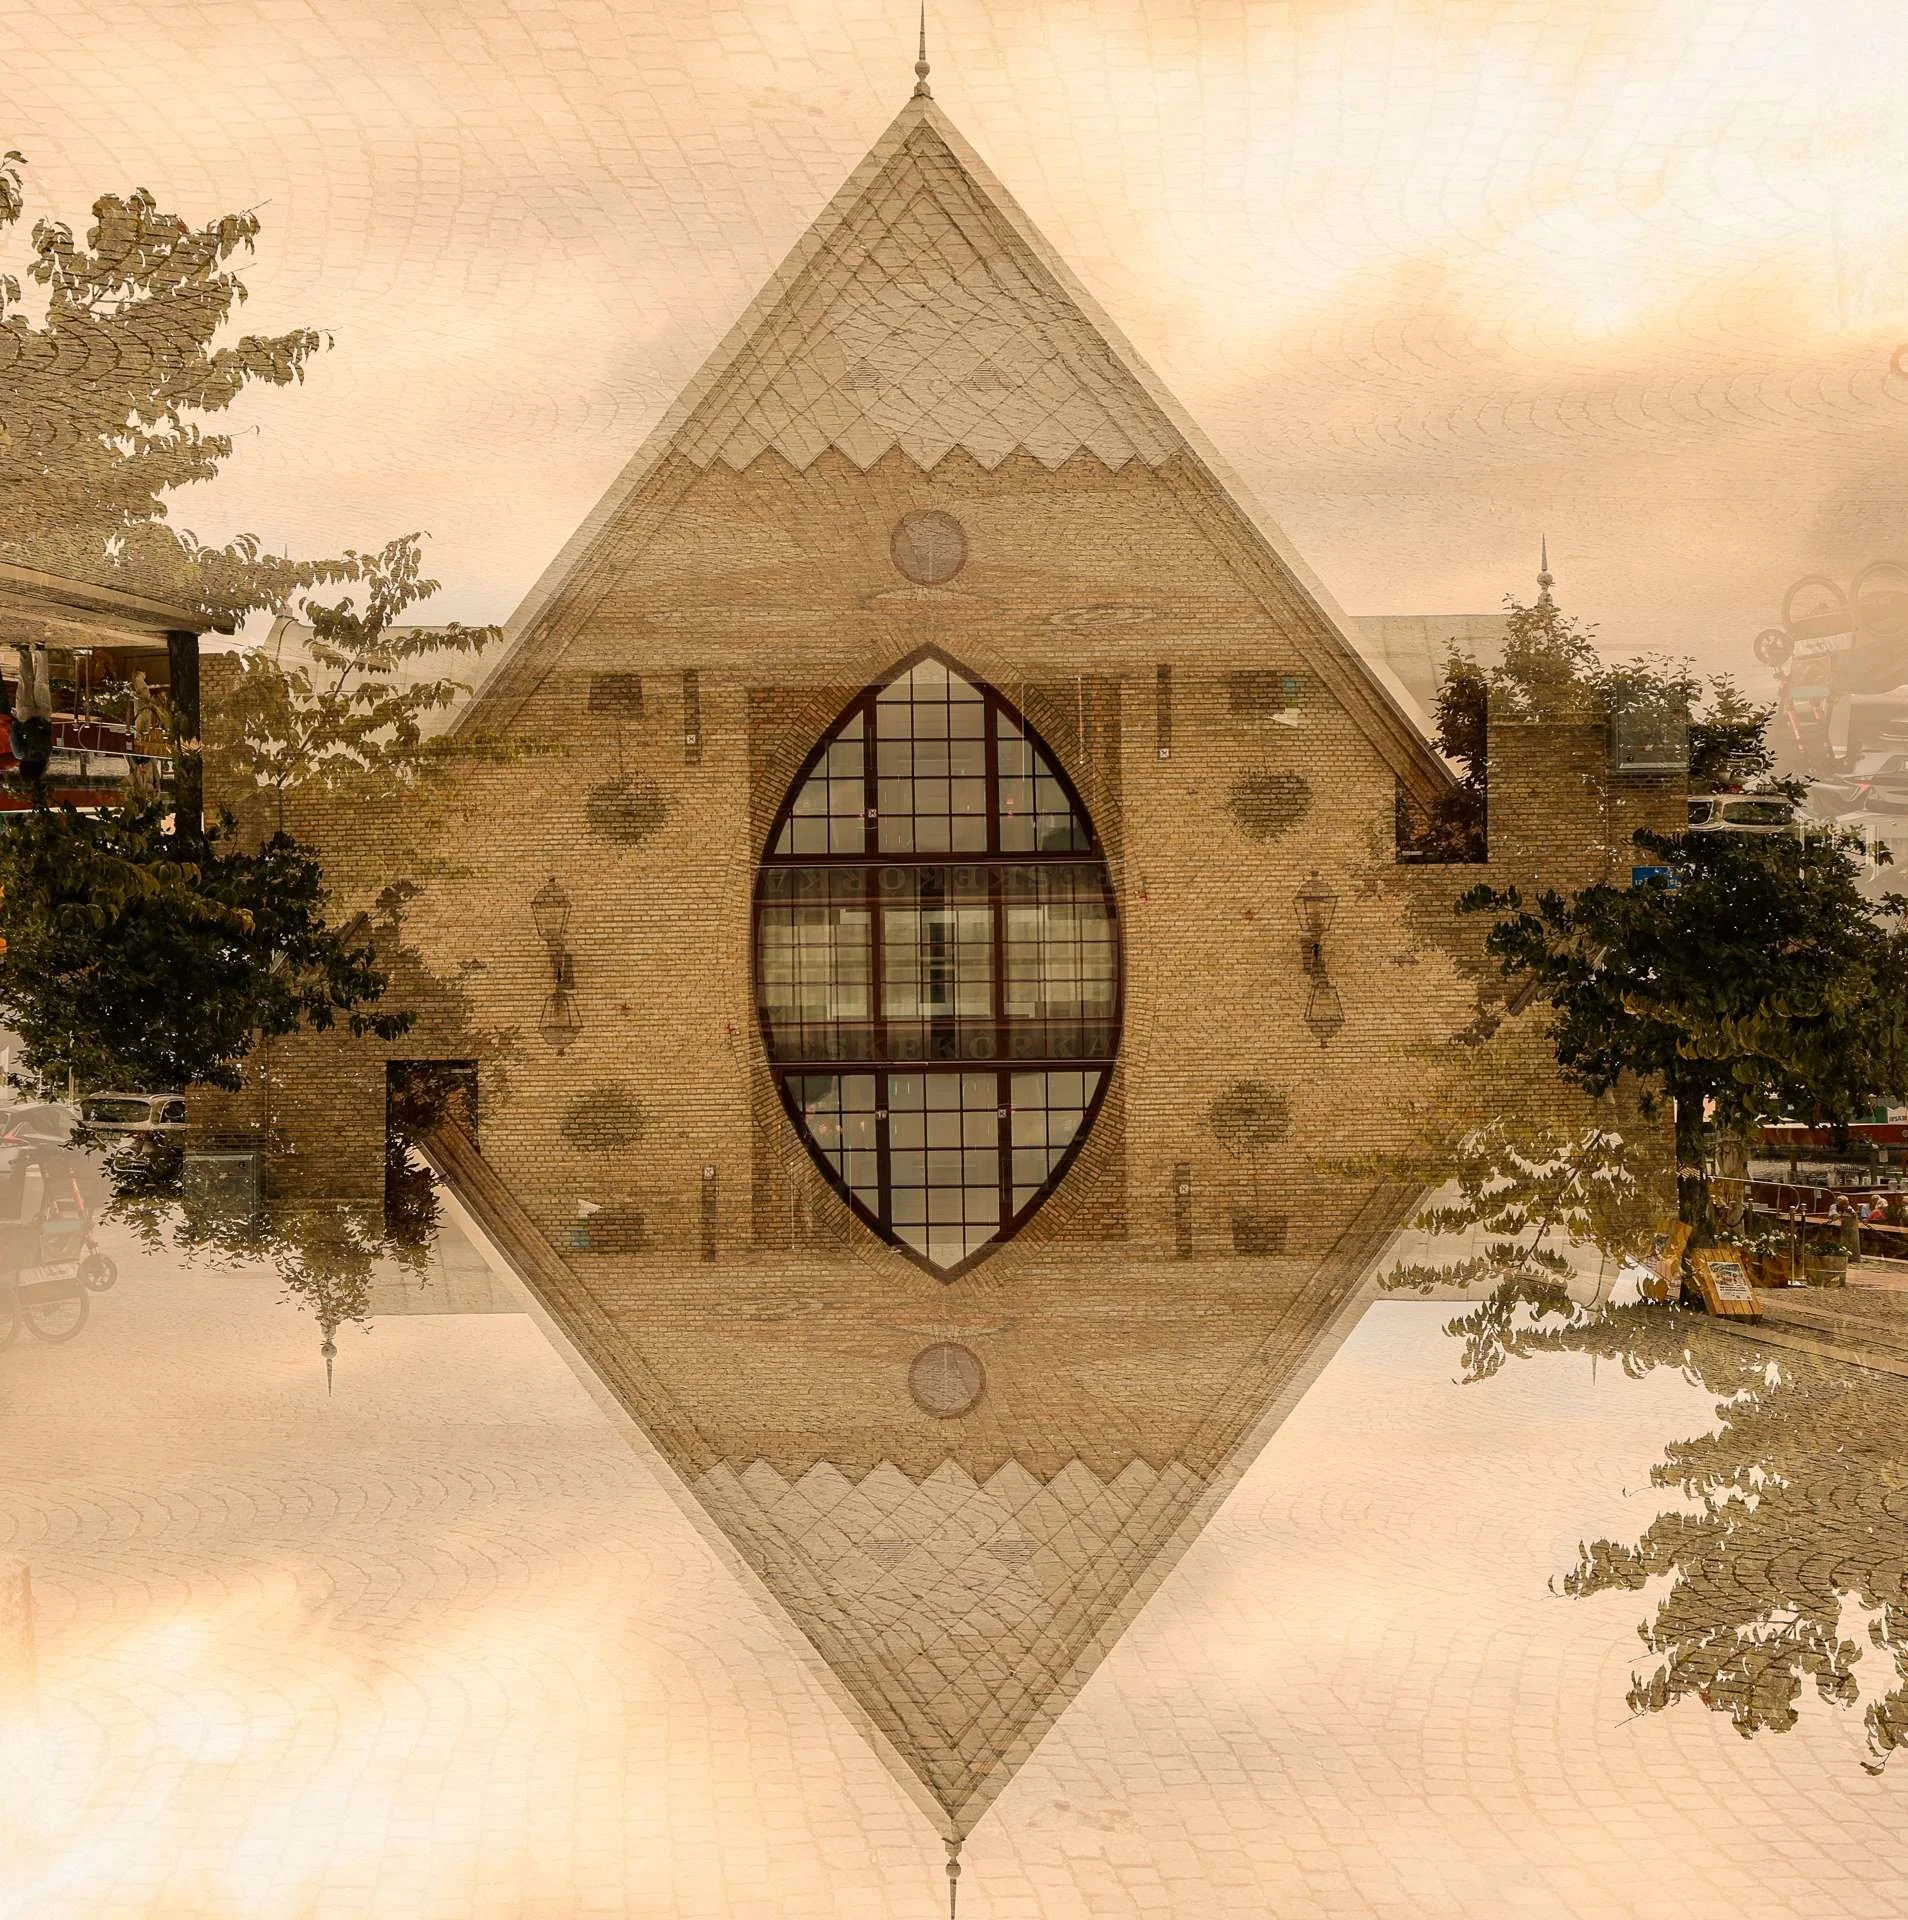
An In-Camera Multiple Exposure Photography Image of Feskekorka in Gothenburg, Sweden
4. Using Dark Mode with Bright Colours
Dark mode is a fascinating setting in multiple exposure photography—it doesn’t “darken” the image as such. Instead, for every pixel, the camera chooses the darker value between exposures. This makes it ideal for scenes rich in strong colours, as it enhances depth and intensity.
This technique comes into its own in autumn, when nature’s palette is ablaze with reds, yellows, and golds. My example here is an Acer tree from Hodnet Gardens in Shropshire. Hodnet Hall Gardens are over 60 acres of beautifully landscaped grounds, filled with rare trees, reflective pools, and vibrant flowerbeds—a dream for photographers.
For this image, I used two exposures: one in focus, one out of focus. The red-on-red layers glow with richness, creating an impressionistic feel. Dark mode allows those fiery hues to deepen naturally, without losing the sense of texture and structure that makes foliage photography so satisfying.
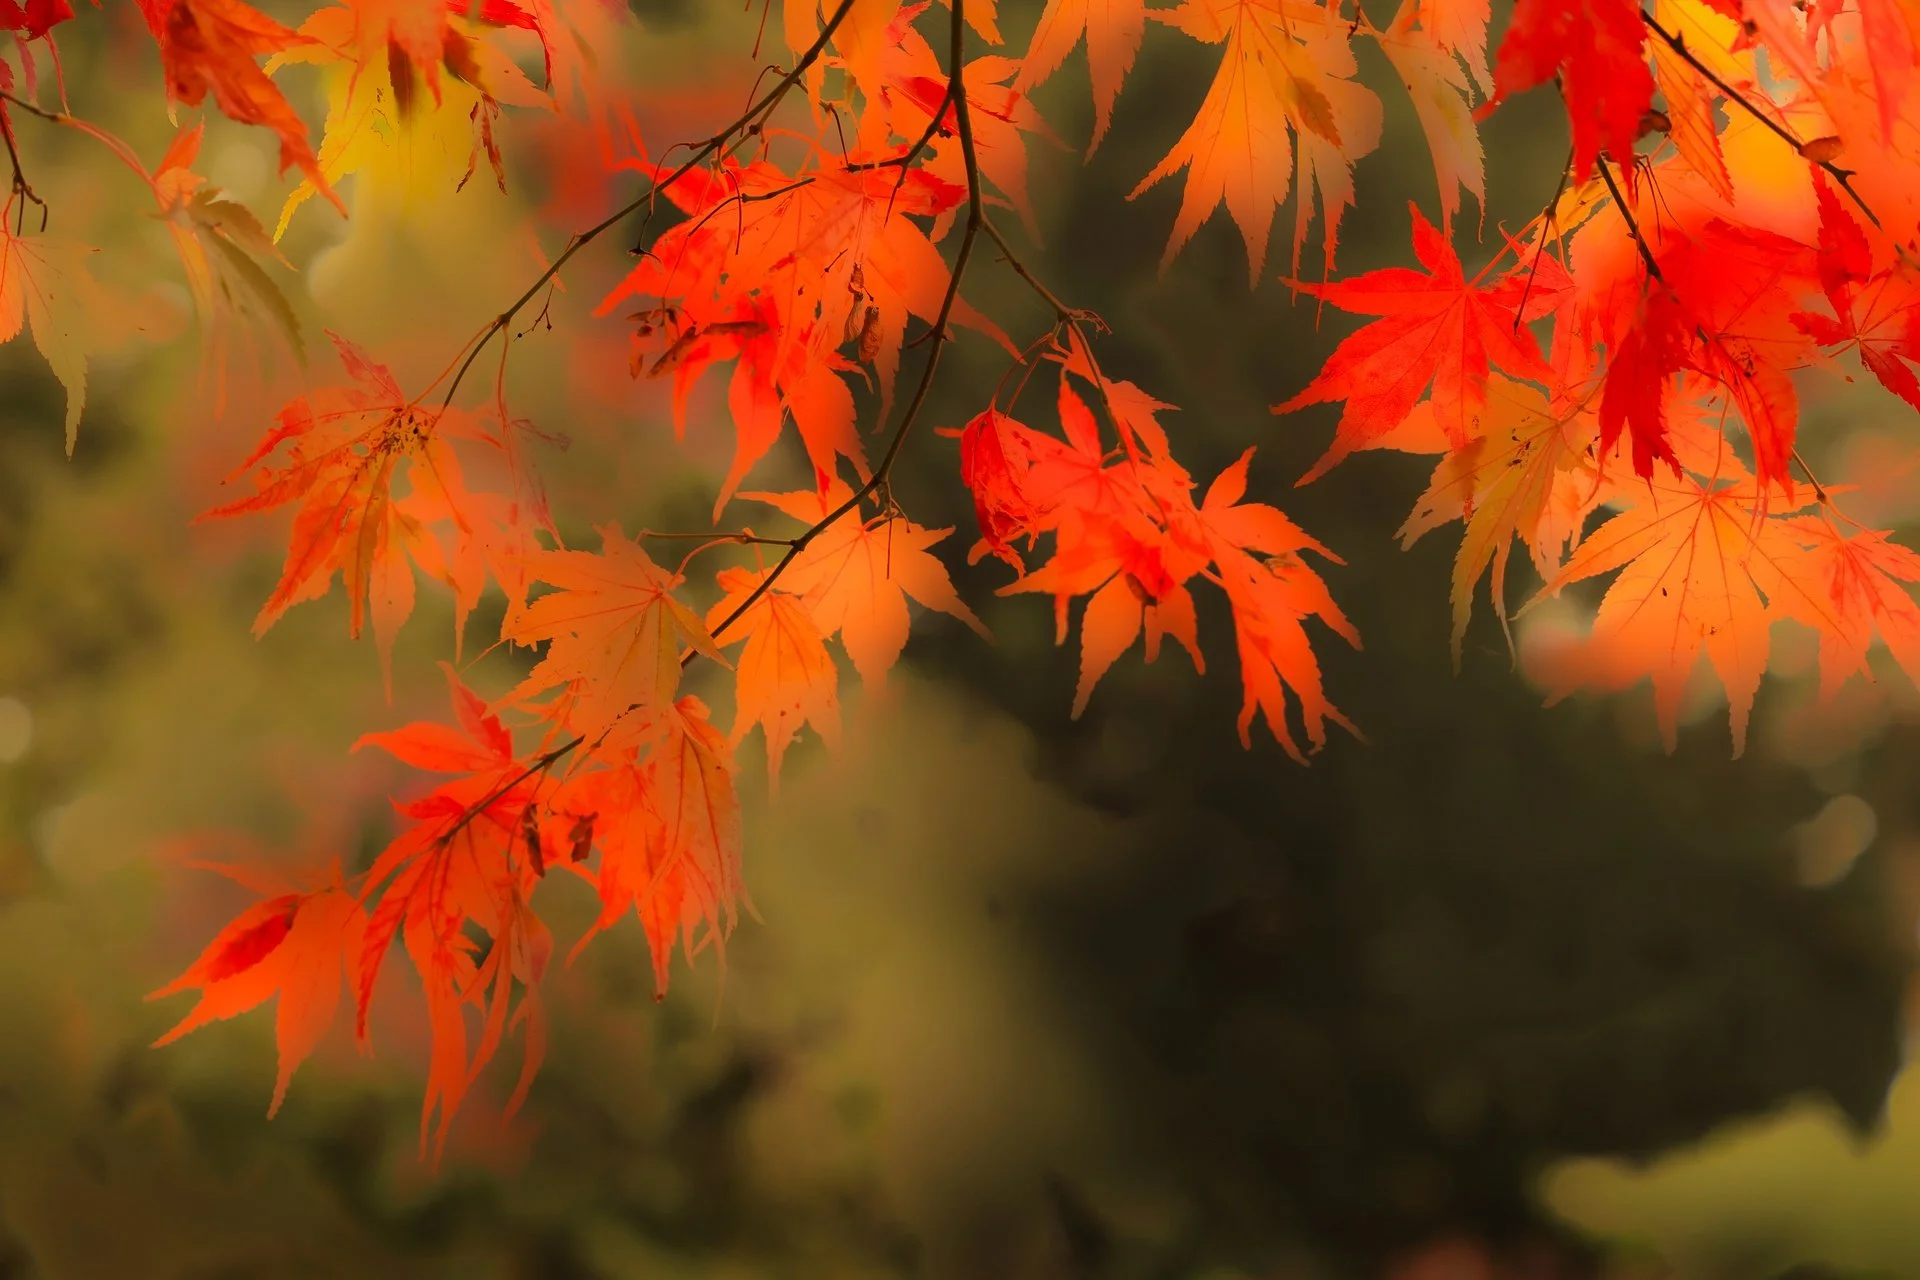
An In-Camera Multiple Exposure Photography image of Autumn Leaves
5. In Focus and Out of Focus
Finally, one of the most versatile and endlessly creative multiple exposure techniques: combining in-focus and out-of-focus frames. As we move into winter and the festive season, there are so many opportunities to use lights, reflections, and colour for this approach.
It doesn’t matter which order you shoot the exposures in—though personally, I prefer to take the sharp image first. I find it easier to place the soft, blurred frame afterwards to balance the composition.
The key steps are to switch your lens to manual focus between exposures, then deliberately defocus. Don’t be afraid to go further than you think—more blur often adds more magic! Also, remember to set your aperture to the lowest available f-stop so that the defocused image is as soft and luminous as possible.
The image I’ve used here is from Tottenham Court Road in London—one I’ve shared before, but it’s such a perfect demonstration of this technique that it deserves another outing. The lights blend and shimmer, transforming an ordinary city scene into something full of wonder.

An In-Camera Multiple Exposure Image of Tottenham Court Road, London at Christmas
A Final Thought
In-camera multiple exposure is a playground for creative photographers—it invites you to let go of perfection and enjoy the process of discovery. Every experiment teaches you something new about light, texture, and visual rhythm.
I’d love to hear what you think of these five techniques—or see what you’ve created using them! Please do leave a comment below and share your own images or ideas. And if you haven’t already, make sure you’re signed up to my newsletter for more creative tips. If this has inspired you to want to go out with your camera then maybe join me on one of my in person workshops or join and online course at the Wilde Photography Academy. Let’s keep exploring the magical world of in-camera creativity together.