Multiple Exposure Photography with the Nikon Z5II: A Creative Review
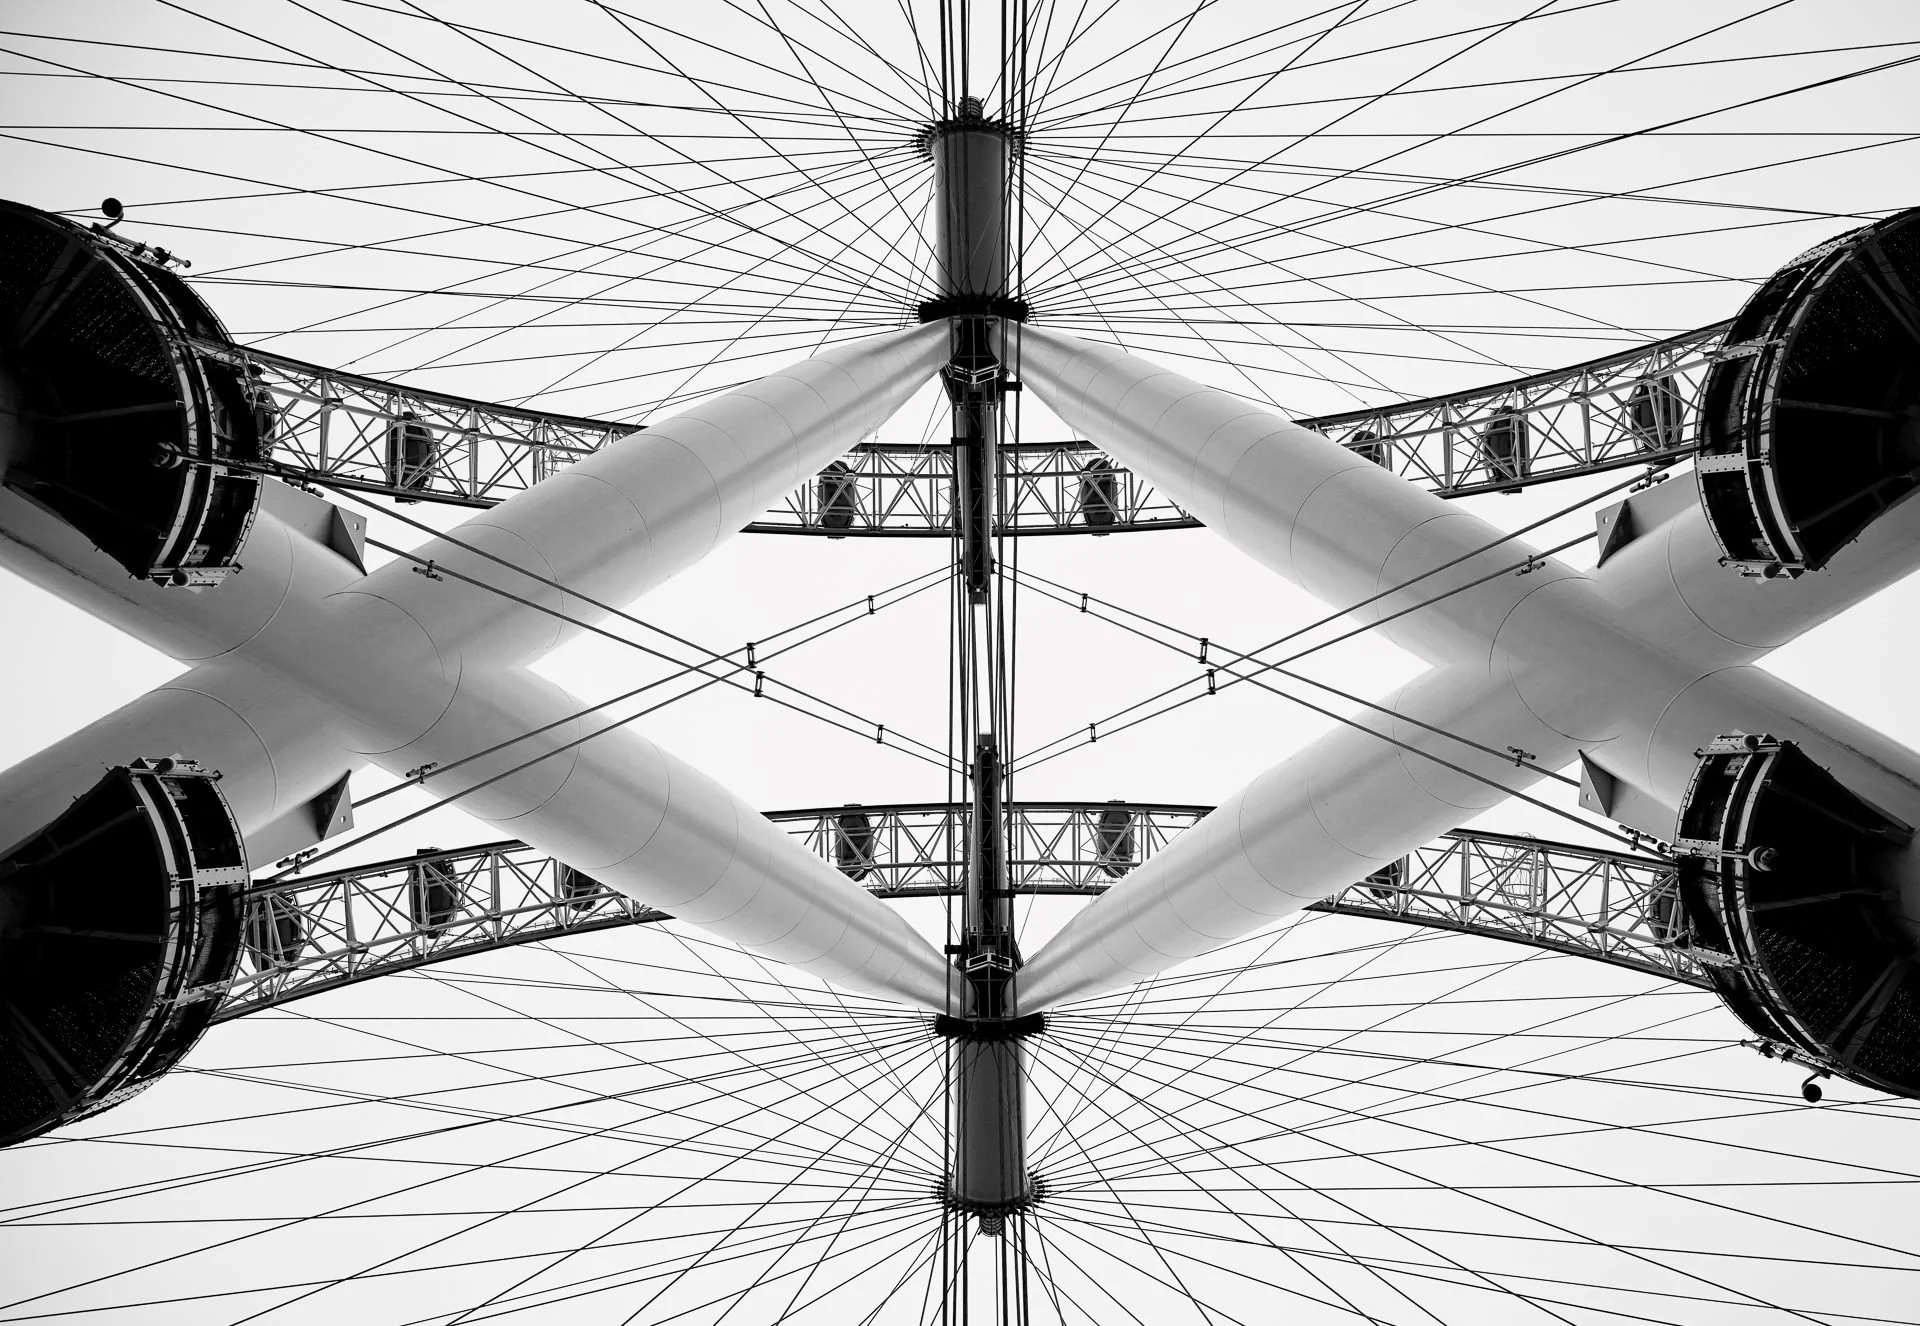
A In Camera Multiple Exposure Photography Image of the London Eye taken with the Nikon Z5II
Exploring Multiple Exposure on the Nikon Z5 II
Multiple exposure is one of those features that invites you to slow down, look more carefully, and respond creatively to what’s in front of you. Rather than photographing with the intention of “fixing it later”, it encourages decision-making at the point of capture — something I always find far more rewarding.
Nikon kindly allowed me to have a Z5 II camera and a NIKKOR Z 24–120mm f/4 S lens on loan in order to write this blog, so all of the images you see here were created using that exact setup (apart from the one of the actual camera….!) The Z5 II is a compact full-frame camera aimed at both content creators and photography enthusiasts, offering a balance of portability, creative flexibility, and image quality.
I won’t be going into all of the technical specifications here, as there are plenty of excellent resources that already do that far better than I could. Instead, I want to jump straight into the multiple exposure functions and explore how they work in practice from a creative photographer’s point of view. If you’d like to read more about the camera itself, please head over to the Nikon website or this SheClicks review, both of which give a thorough overview.
You may also want to take a look at my previous blogs on multiple exposure using the Canon R6 Mark II or the Fujifilm X-T5, where I explore how different camera systems approach in-camera creativity.
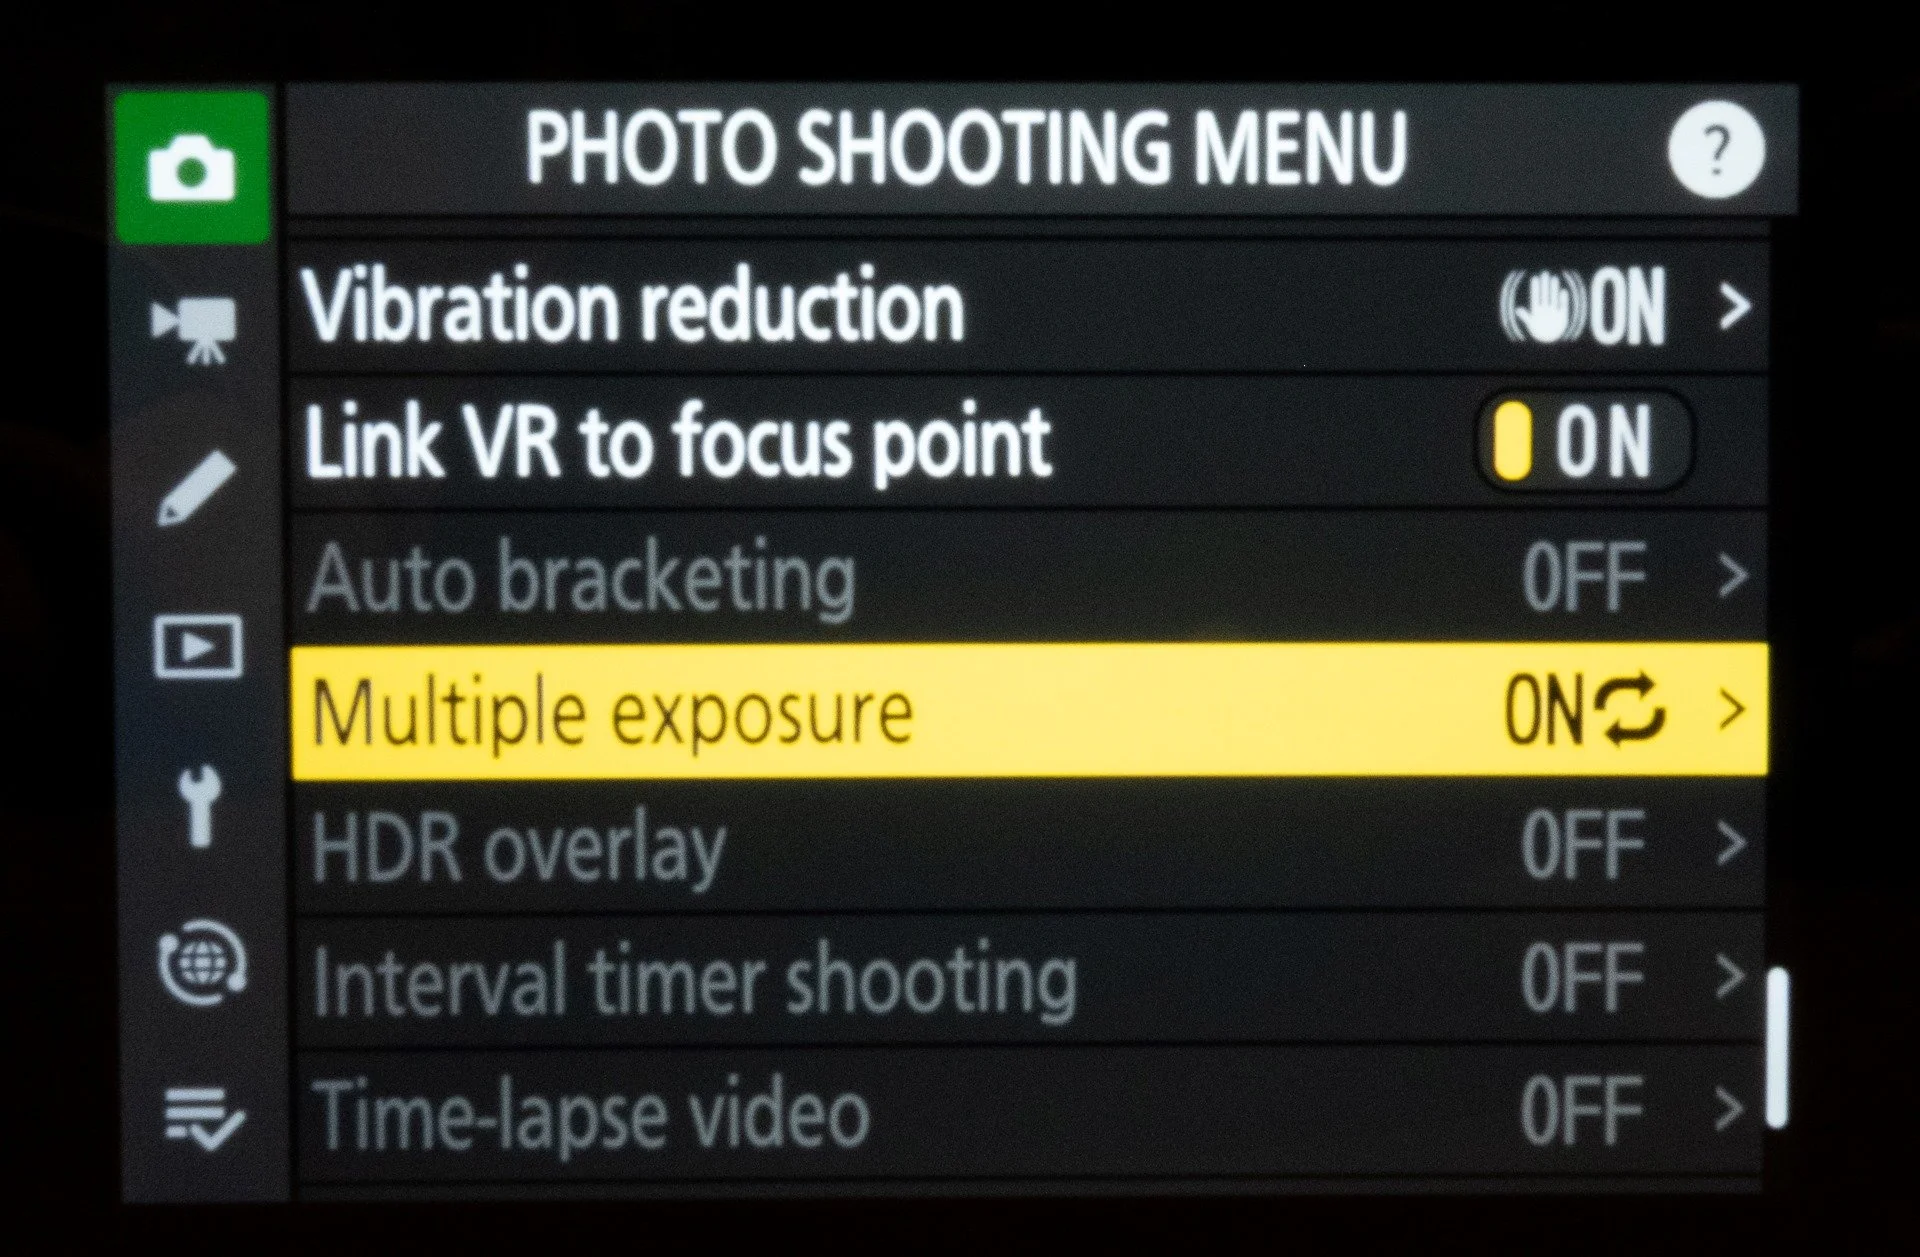
Where you find the Multiple Exposure Menu in the main menu of the Nikon Z5II
What Is In-Camera Multiple Exposure?
If you have visited the site before or are part of the newsletter, you’ll already know this — but for those who are new visitors, a little context first.
In-camera multiple exposure allows you to combine two or more photographs into a single image at the moment of capture. Rather than creating separate frames with the intention of blending them later in software, the creative decisions are made while you’re shooting. Composition, subject choice, exposure, and timing all work together in real time.
The key difference is that the camera becomes part of the creative thinking process rather than simply a recording device. This approach encourages a slower, more intuitive way of working and often leads to results that feel more considered and personal — something I find particularly satisfying when working with architecture, movement, and abstraction.

An In Camera Multiple Exposure photography Image of St Paul’s Cathedral taken with the Nikon Z5II

An Image of the Multiple exposure menu on the Nikon Z5II
Multiple Exposure Features on the Nikon Z5 II
The Nikon Z5 II offers a generous and flexible set of multiple exposure options that support both simple experimentation and more complex creative ideas.
You can combine between 2 and 9 frames into a single multiple exposure, allowing anything from a straightforward double exposure to layered images built up gradually over several shots.
Blend modes
The Z5 II includes four blend modes, each producing very different results:
Additive adds together all of the exposures, often resulting in a very bright final image
Average averages the exposures together, helping to keep overall brightness under control
Lighten takes the lightest pixel from each position and displays that in the final image
Darken takes the darkest pixel from each position and displays that in the final image
Because Lighten and Darken are comparing individual pixels, the results are not always what you might expect. An image created using Darken mode is not necessarily very dark, and conversely Lighten doesn’t always produce a particularly light image. This unpredictability is part of what makes these blend modes so creatively interesting.
You must also ensure that Overlay shooting is turned on as otherwise you will not see your multiple exposure build up on the screen in your camera.
As the Z5 II is a mirrorless camera, the multiple exposure preview is visible both on the rear screen and in the electronic viewfinder. Being able to use the viewfinder for preview gives greater stability and precision when composing subsequent exposures, particularly when working handheld.
The camera also allows you to change the number of exposures using the i button. This gives you the option to delete the entire multiple exposure, retake the frame you have just shot, or save the image regardless of how many exposures you originally programmed. This is extremely useful if, for example, you set the camera to shoot nine frames but realise after two exposures that you already have an image you’re happy with.
Another standout feature is the ability to start a multiple exposure using an image already stored on your SD card. You simply select that option and then shoot further exposures over the top, which opens up a wide range of creative possibilities.
Finally, the Z5 II allows you to save the individual RAW files as well as the finished JPEG multiple exposure, giving you flexibility for post-processing if the result didn’t quite work out as you imagined.
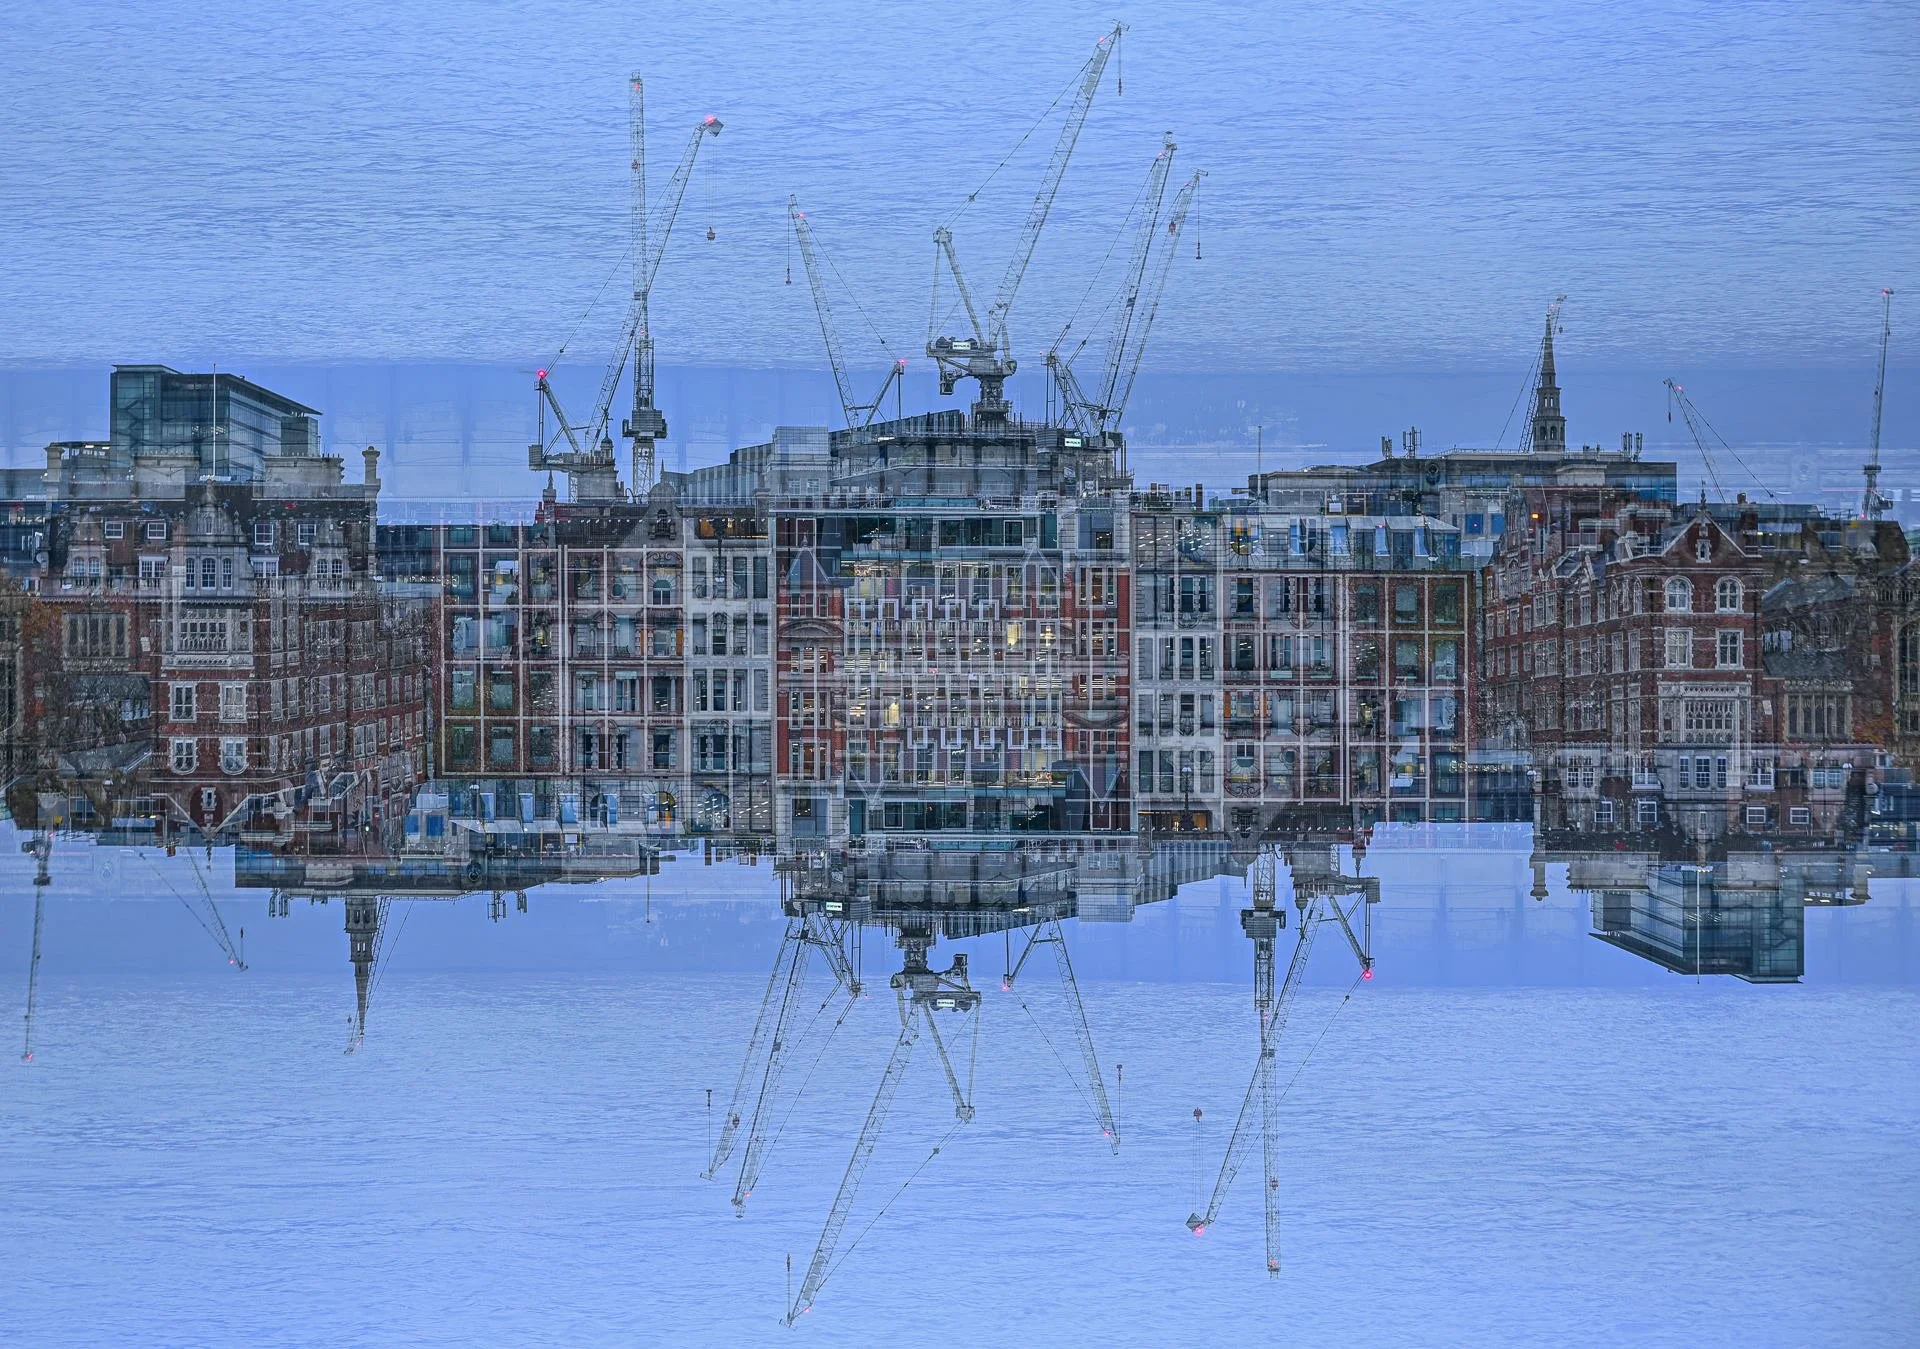
An In Camera Multiple Exposure Photography image of the South Bank taken with the Nikon Z5II
Creative Possibilities with the Nikon Z5 II
Multiple exposure on the Z5 II offers a huge range of creative possibilities, shaped not only by the subjects you choose but also by how you control the camera between exposures.
In addition to the built-in multiple exposure functions, you can change a whole host of settings between each frame, including focus, focal length, white balance, colour or black and white, and shutter speed. This means you’re not locked into a single approach from the outset — you can respond intuitively as the image develops.
This flexibility, although not unique to this camera, makes the Z5 II particularly appealing to photographers who enjoy experimentation and the process of discovery. It suits those exploring abstraction, visual storytelling, architecture, movement, or simply wanting to see familiar subjects in a new way. There are techniques that suit architecture and nature lovers alike as you can see from the images in this blog.
If you’d like to explore this further, please do have a look at my blog “My Top 5 In-Camera Multiple Exposure Techniques”, where I go into more detail about different creative approaches.

An abstract Multiple Exposure Image of berries on a tree using the Nikon Z5II
Strengths and Limitations of Multiple Exposure on the Nikon Z5 II
As with any camera, there are clear strengths alongside a few things worth being aware of.
Strengths
Menus offer a large number of options for flexible multiple exposure shooting
The camera stays in multiple exposure mode even if you turn it off, making it easy to enjoy a whole day of multiple exposure photography
Good choice of blend modes
Ability to start with a RAW image already on the card
Saves the individual RAW files as well as the finished multiple exposure image
Limitations
Menus are quite long, so until you set up the favourites section some options require a fair amount of scrolling
Changing what you do with your image partway through a multiple exposure requires several button presses
Although not really a limitation, but worth noting: the camera won’t activate multiple exposure unless there is a card in the camera

A Multiple Exposure Photography image taken from the Millenium Bridge with the Nikon Z5II
Final Thoughts: Is the Nikon Z5 II Good for Multiple Exposure Photography?
I genuinely enjoyed taking multiple exposure images with the Nikon Z5 II. The combination of flexibility, preview options, and creative control makes it a very enjoyable camera to work with if in-camera creativity is important to you.
If you’re considering an upgrade and are particularly interested in multiple exposure photography, this is a camera I would definitely say is worth buying. It supports both playful experimentation and more considered image-making, while still giving you the safety net of RAW files if you want to refine things later.
Rather than overwhelming you with complexity, the Z5 II strikes a thoughtful balance between control and creativity — encouraging you to explore ideas, respond intuitively, and enjoy the process of building images in camera.
Thank you so much for taking the time to read this post. If you enjoyed it and found it helpful, I’d love you to comment below . In addition, do consider joining the newsletter if you haven’t already. It’s where I share new blog posts, creative ideas, and updates first, and it’s the easiest way to stay connected with what I’m working on.
You’re also very welcome to head over to the Multiple Exposure Hub on Facebook and join the conversation there. It’s a supportive, creative community where photographers share images, ideas, and inspiration around in-camera multiple exposure — and it’s a great place to keep learning and experimenting.